






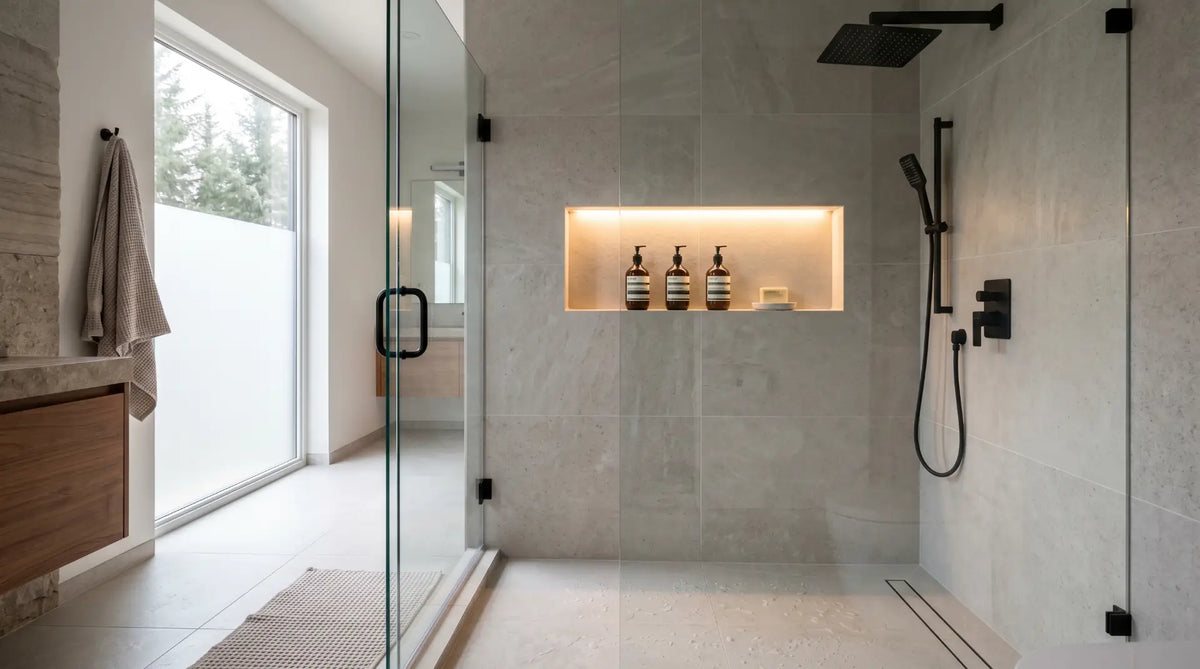
A shower niche is one of the most satisfying details in a bathroom renovation - and one of the most technically consequential. Get the placement wrong and you cut into a load-bearing or plumbing wall. Get the sizing wrong and your shampoo bottles don't fit. Get the waterproofing wrong and you'll be retiling in three years. This guide covers all of it.
A shower niche is the detail that separates a shower that feels finished from one that feels designed. Practically, it eliminates the corner caddy, the suction-cup shelf, and the row of bottles lined along a threshold - all of the improvised storage solutions that make a shower look cluttered regardless of how well the tile work and fixtures are specified. Aesthetically, a well-proportioned niche creates a visual pause in the shower wall - an opportunity for a different tile, a different material, a linear LED strip, or simply the same tile used more intentionally as a framed element.
The challenge is that a shower niche is one of the few bathroom decisions that must be made and executed correctly at the rough-in stage - before tile, before waterproofing membrane, before any finished surface is in place. Unlike a faucet or a towel bar that can be swapped later, a niche cut into the wrong wall, built to the wrong depth, or waterproofed inadequately will either cause structural damage over time or require a full tile demolition to correct. The decisions made in the framing stage determine whether the niche performs for twenty years or fails in three.
This guide covers every dimension of shower niche planning: the wall assessment and structural considerations, the size and placement rules that suit actual bottle and product dimensions, the waterproofing requirements that Canadian codes and best practices mandate, the design options across niche formats and tile combinations, and the lighting integration that elevates a niche from a functional recess to a deliberate design moment.
In a typical Canadian bathroom renovation timeline, shower niche placement is confirmed when the shower walls are framed or when backer board is being installed - before waterproofing membrane and long before tile. The niche location needs to be chosen early enough that the tile layout can be designed around it (centering the niche on a tile grid, for example, avoids awkward partial tiles at the niche edges and is only achievable if the tile size is known before the niche is framed). Choosing a niche location after tile has been ordered - or worse, after tile installation has begun - almost always results in a niche position that fights the tile layout. Plan the niche and the tile together, not sequentially.
A shower niche can only be built into an interior non-load-bearing partition wall that does not contain plumbing supply lines or drain venting. This eliminates most of the walls in a typical Canadian shower enclosure at first assessment - which is why wall selection is the first and most important step, not the tile selection or the niche dimensions.
| Wall Type | Can You Niche Here? | Why |
|---|---|---|
| Interior non-load-bearing partition wall | Yes - ideal | Standard 3.5" stud cavity provides the depth needed. Confirm no plumbing inside the cavity before cutting |
| Exterior wall | Never | Cutting through insulation in an exterior wall creates a thermal bridge and condensation point - a guaranteed source of mould in Canadian climate conditions. Insulation cannot be adequately reinstated around a niche cavity |
| Plumbing wall (contains supply lines or drain vent) | No | Pipes run vertically and horizontally through this cavity - cutting risks striking a live pipe. Even if pipes are avoided, the cavity is already occupied and niche depth is not available |
| Load-bearing wall | No - without engineer | Cutting a niche opening between load-bearing studs removes structural material. Requires a structural engineer's assessment and potentially a header addition - not a standard renovation scope |
| Back wall of shower (opposite the shower head) | Check first | Often the ideal niche wall - typically an interior partition. Confirm with a stud finder and cavity probe before committing. This is the most common correct location in Canadian shower renovations |
| Side wall adjacent to shower head | Check first | May contain the plumbing supply lines for the shower valve - confirm cavity is clear before planning a niche on this wall |
| Knee wall / half wall | Yes, with care | A knee wall or half wall in a walk-in shower can accommodate a niche on either face, provided it is built with adequate depth and fully waterproofed. Often used for decorative niches in master suite open-concept showers |
- Wall identified as interior partition - not exterior, not plumbing wall, not confirmed load-bearing
- Stud locations marked with stud finder - niche will be framed between two studs
- Cavity contents probed - no pipes, no electrical in the cavity at the niche location
- Wall construction confirmed - wood stud framing (niche possible) or masonry (surface-mount alternative required)
- Niche location on back wall or side wall confirmed - exterior wall ruled out
A shower niche that looks beautiful but cannot hold a standard shampoo bottle upright is a failure of planning. The most common sizing mistake in Canadian shower renovations is dimensioning the niche to a round number that feels right - say, 30cm wide by 20cm tall - without checking those dimensions against the actual products the niche will hold. A standard 400mL shampoo bottle is typically 8-10cm in diameter and 22-26cm tall. A niche built at 20cm height cannot hold it without the cap protruding above the niche opening. A niche built at 22cm depth on a standard stud wall does not have that depth available.
The correct approach is to dimension the niche around the products it will hold, then reconcile those dimensions with the tile coursing of the chosen tile. A niche built to dimensions that don't align with the tile grid - requiring cut tiles at every niche edge - looks noticeably worse than one that falls on grout lines. This reconciliation between product dimensions and tile coursing is the planning step that separates a niche that reads as intentional from one that reads as an afterthought.
The most overlooked niche planning step is reconciling niche dimensions with the tile grid before framing. Measure your tile size and grout joint width, then map the niche opening dimensions onto the tile layout drawn to scale. Adjust niche dimensions by 1-2cm if needed so the niche edges fall on grout lines rather than mid-tile. For a 10cm × 20cm subway tile with 3mm grout joints, for example, a niche width of 30.9cm (three full tiles plus three grout joints) avoids a cut tile at the niche edge entirely. This planning step takes fifteen minutes and saves hours of tile cutting - and results in a niche that looks professionally built rather than improvised.
| Household / Use Case | Recommended Niche Width | Recommended Niche Height | Shelves |
|---|---|---|---|
| Single user - minimalist routine | 30cm (12") - one bottle bay width | 25cm (10") - single tier, upright bottles | None - open single tier |
| Single user - full product lineup | 30-36cm (12"-14") | 50-60cm (20"-24") - two tiers | One shelf dividing into two equal tiers |
| Two users - shared shower | 45-60cm (18"-24") - or two separate niches | 25-30cm per tier | Two shelves creating three tiers, or two separate 30cm niches side by side |
| Master ensuite - premium specification | Full-width niche or two flanking niches | Floor-to-ceiling vertical niche or 60cm+ horizontal band | Multiple shelves; accent tile behind; consider niche lighting |
| Kids' bathroom | 36-45cm (14"-18") | 20-25cm per tier - lower placement for child reach height | One shelf; place niche at 90-100cm from shower floor rather than standard 140cm |
- Back wall of the shower - typically an interior partition, away from the shower head, naturally sheltered from direct spray
- Height of 130-150cm from shower floor - at elbow height for an average adult, easy to reach without bending or stretching
- On the non-dominant hand side of the shower - keeps the dominant hand free to reach for products
- Centred on the back wall - visually balanced and proportional, aligns naturally with the tile grid
- Between two existing studs (single-bay niche) - structurally straightforward, no header required in most cases
- On the same wall as the shower valve - only if the cavity has been confirmed clear of plumbing on that specific portion of the wall
- Any exterior wall - insulation disruption creates condensation and mould in Canadian climates
- The plumbing wall (where the shower valve and supply lines run) - cavity occupied by pipes
- Directly behind the shower head - maximum spray exposure accelerates grout and sealant deterioration
- Below 60cm from the shower floor - products difficult to reach, and prolonged water standing in niche at floor level
- Above 170cm from the shower floor - products require reaching above shoulder height; not practical for daily use
- Spanning across a stud - requires a header installation and structural consideration beyond standard renovation scope
- In the floor of a walk-in shower - standing water in a floor-level niche leads to persistent moisture retention and grout failure

A shower niche is a five-sided box open at the front - and every one of those five surfaces, plus every internal corner where they meet, must be fully waterproofed before tile is applied. This sounds obvious but is frequently under-executed in Canadian shower renovations: the back wall gets a membrane, but the internal corners are bridged with compound rather than waterproof tape and membrane, or the niche floor membrane is applied without wrapping up onto the side walls with adequate overlap. Any gap in the waterproofing system at a corner or joint is a slow-motion water intrusion path that will cause tile delamination, substrate damage, and mould over a period of two to five years.
There are three waterproofing approaches for a shower niche in current Canadian renovation practice, each with a different risk and execution profile. The correct approach for a DIY renovation differs from the correct approach for a professional tile installer - the systems designed for DIY application are specifically engineered to reduce the skill required for corner and joint execution.
- Backer board substrate confirmed - cement board, Kerdi board, or Wedi board; no drywall or green board in any shower niche surface
- All five niche surfaces covered with waterproofing membrane - back wall, two side walls, ceiling, and floor
- All eight internal corners (where the five surfaces meet) reinforced with fabric mesh tape embedded in membrane - not bare compound
- Niche floor sloped forward at minimum 3° toward shower - confirmed with a level before membrane is applied
- Membrane lapped onto the surrounding shower wall at all niche edges - minimum 5cm overlap at perimeter
- Any pre-formed niche insert installed per manufacturer instructions - thinset coverage confirmed on all contact surfaces
- Membrane fully cured before tile application - manufacturer cure time respected
A shower niche is an opportunity to introduce a second tile material, a contrasting colour, or a more complex format tile without the cost and commitment of using that material across an entire shower wall. The niche becomes a framed composition - a small canvas within the larger field tile - and because it is contained, even a premium accent tile used inside the niche adds minimal material cost while providing a significant design uplift.
The most effective design approach for a niche accent is to choose a material that contrasts with the field tile in texture, tone, or scale, rather than a material that is simply a different colour of the same tile format. A marble mosaic inside a large-format ceramic field tile reads well. A zellige tile in a warm terracotta tone inside a white subway tile field reads beautifully. A brushed metal tile inside a stone-look porcelain creates a material contrast that draws the eye. The niche accent does not need to be expensive - it needs to be considered.

A linear LED strip recessed into the niche ceiling or along the niche sides transforms the niche from a storage recess into a glowing focal point - visible from the moment you enter the bathroom and particularly effective at night or in a windowless shower enclosure. The LED illuminates the accent tile inside the niche, creates a soft wash of light down the niche back wall, and signals to anyone who sees it that the shower was designed with intentional detail rather than simply assembled.
The technical requirements for niche LED lighting in a Canadian shower are non-negotiable. The LED strip must carry a minimum IP65 water resistance rating (sealed against water jets) - and IP67 or IP68 is preferable for a niche that may receive direct spray. The transformer (LED driver) must be located outside the wet zone - typically in the ceiling above the shower, in the vanity cabinet, or in a wall cavity adjacent to the shower - connected to the LED strip by a waterproofed cable. The electrical connection and transformer placement must be executed by a licensed electrician to meet Canadian Electrical Code requirements for wet location wiring. This is not a DIY step, even if the LED strip installation itself is straightforward.
The LED strip should be installed in a recessed aluminium channel with a diffuser - this spreads the light evenly rather than creating a visible line of individual LED dots, which looks unfinished at the premium specification this lighting is intended to achieve. Warm white (2700K) is the most flattering colour temperature for a shower niche - it enhances the warmth of stone and wood-look tiles and creates an inviting glow rather than a clinical brightness.
A recessed niche requires a stud wall with a clear cavity and a tile installation that has not yet begun - conditions that are not always present. In an existing finished shower, a masonry-walled apartment bathroom, a rental property, or any situation where cutting into the wall is not practical, the following alternatives provide storage and some degree of the visual improvement a built-in niche offers.
| Alternative | Best For | Limitations | Approx. Cost (CAD) |
|---|---|---|---|
| Surface-mount prefab niche insert | New tile installations where wall cavity is not available - the insert is tiled over like a recessed niche | Projects 7-10cm from the wall surface - adds depth to the shower wall. Not truly flush. Must be installed before tile, not after | $60-$180 for the insert; tiling labour additional |
| Floating stone or glass shelf | Existing finished showers - drilled and anchored into tile with waterproof adhesive and anchors | No back wall; products can fall off the open shelf. Limited to hard surfaces (stone, glass, solid surface) that resist shower moisture | $80-$300 depending on material and size |
| Corner tension pole with shelves | Rentals, temporary setups, or showers where drilling is not permitted | No structural attachment - can tip if overloaded. Rust-prone in hard water unless confirmed stainless or aluminium. Not a design upgrade - a pragmatic storage solution | $30-$80 |
| Teak or bamboo corner shelf | Walk-in showers with a corner to mount into - drilled into grout joints with appropriate anchors | Natural wood requires regular oiling in shower conditions or it will grey and degrade. Not suitable for Canadian hard water without consistent maintenance | $60-$200 |
| Recessed shower caddy (surface slim profile) | Existing showers where a thin shelf on the wall is acceptable | Limited storage depth. Visible mounting hardware. Does not achieve the clean built-in look of a proper niche | $40-$120 |
- Target wall confirmed as interior partition - not exterior, not plumbing wall, not load-bearing without engineer sign-off
- Stud locations marked - niche opening planned between two studs (single-bay) or header planned for multi-bay width
- Cavity probed - confirmed clear of electrical wiring, plumbing supply lines, and drain venting at niche location
- Wall construction confirmed - wood stud (niche possible) or masonry (surface-mount alternative selected)
- Niche width confirmed at minimum 30cm - adequate for two bottles side by side; 36cm recommended for two-person household
- Niche height confirmed at minimum 25cm per shelf tier - accommodates standard shampoo bottle upright with clearance
- Niche dimensions reconciled with tile grid - edges aligned to grout lines to avoid cut tiles at niche perimeter
- Placement height confirmed at 130-150cm from shower floor to niche bottom - optimal reach zone for an adult
- Placement wall confirmed as back wall (opposite shower head) - minimises direct spray exposure
- Niche floor slope of minimum 3° forward planned - confirmed before framing and substrate installation
- Cement board, Kerdi board, or Wedi board confirmed as niche substrate - no drywall, no green board
- Waterproofing system selected - prefab Kerdi niche insert, sheet membrane, or liquid-applied membrane
- All five niche surfaces waterproofed - back wall, two sides, ceiling, and sloped floor
- All eight internal corners reinforced with fabric tape embedded in membrane - not bare compound
- Membrane lapped onto surrounding shower wall at all niche edges - minimum 5cm overlap
- Niche accent tile selected - contrasts with field tile in one dimension (colour, texture, or scale) only
- Shelf material and finish confirmed - porcelain tile, natural stone, or solid surface; no unsealed wood inside niche
- Niche format confirmed - horizontal single, multi-shelf stack, full-height, corner, or flanking pair
- If LED lighting planned: IP65+ rated strip selected, transformer location outside wet zone confirmed, licensed electrician booked
- Niche finish (tile colour, grout colour) coordinated with hardware finish and overall bathroom palette
Shop shower accessories & hardware at Bathify
Complete your shower renovation with matching hardware - shower heads, hand showers, faucets, and accessories in matte black, brushed nickel, brushed gold, and chrome. Free shipping across Canada on orders over $50.


