






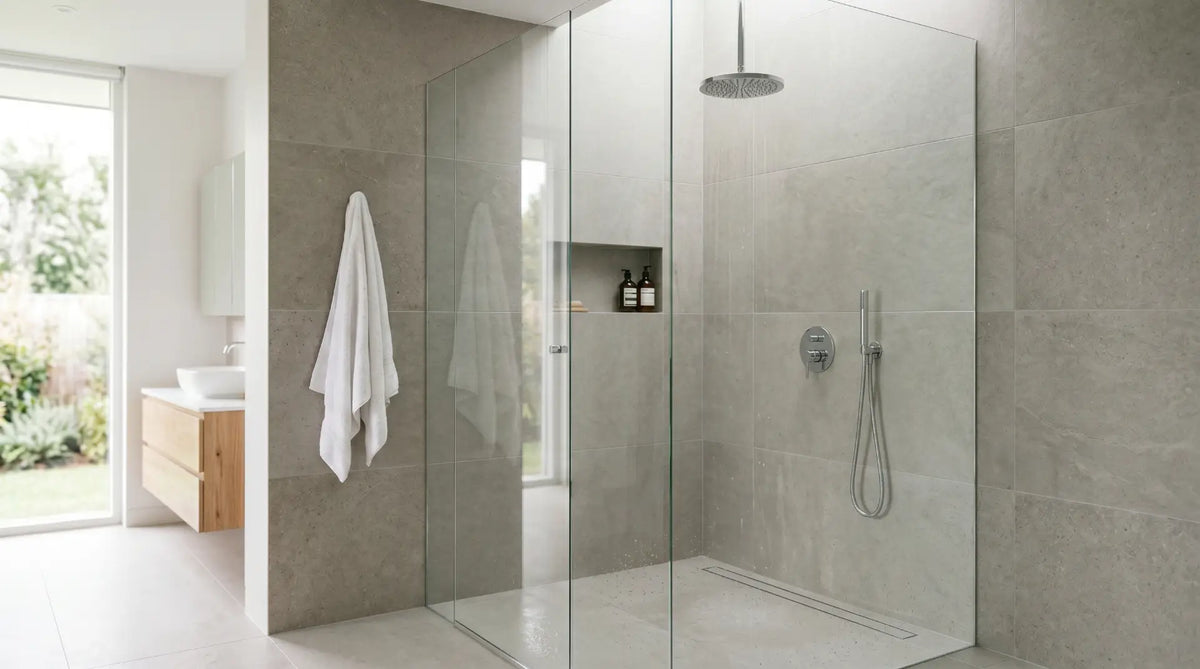
Walk-in showers are the single most requested bathroom renovation upgrade in Canada - and the one with the widest gap between expectation and planning reality. This guide covers every design direction, the sizing decisions that determine daily comfort, the features worth spending on, and the installation details that separate a walk-in shower that works beautifully from one that leaks, feels cramped, or disappoints after the renovation is done.
The appeal of the walk-in shower is easy to understand: it looks cleaner than a tub-shower combination, it photographs better, it feels more spacious, and it signals a design quality that buyers consistently respond to in the Canadian resale market. What's harder to understand - until you're mid-renovation - is that a walk-in shower is also the bathroom element with the greatest number of decisions that affect long-term satisfaction, from the size of the footprint and the configuration of the glass to the waterproofing system behind the tile and the slope of the floor toward the drain.
This guide works through every significant decision in sequence: design style, footprint sizing, glass and enclosure options, feature fixtures, tile strategy, and the installation details that determine whether the shower performs as well in year five as it did on completion day. Canadian-specific considerations - building code minimums, hard water effects on fixtures, climate-related waterproofing requirements, and resale market context - are included throughout.
The most common walk-in shower planning mistake is choosing a design aesthetic before confirming that the available footprint can deliver daily comfort at that design. A frameless glass shower with a rainfall head and bench seating looks exceptional in a 48×60-inch footprint and feels disappointingly cramped in a 36×36-inch one. Settle the footprint first - measure the available bathroom space, subtract the required clearances for the toilet and vanity, and confirm what the shower footprint can actually be. Then choose the design direction that works within that footprint. Reversing this order leads to compromises that are visible every morning.
Shower size is the decision that most directly determines daily satisfaction - and the one most commonly underestimated at the planning stage. These are the three sizing tiers that matter in Canadian bathroom renovations, with the honest assessment of what each delivers in daily use.
Canadian building code minimum for a shower stall. Technically compliant, but the honest assessment is that 36×36 inches (approximately 9 square feet) is functionally limiting for most adults - turning, bending, and reaching in any direction puts you in contact with a wall or glass panel.
Appropriate for: secondary bathrooms where the shower is used infrequently, tight floor plans where there is genuinely no alternative footprint, or as a temporary solution in a conversion project.
Avoid if: The shower will be used daily, the primary occupant is taller than 5'10", or a bench seat or niche are part of the design intent.
The recommended minimum for a comfortable daily-use walk-in shower in a Canadian primary bathroom. The additional 12 inches of depth versus the code minimum creates a qualitatively different experience - enough room to rinse, turn, and move without the walls feeling immediately close.
The 36×48-inch footprint is the most common walk-in shower size in Canadian bathroom renovations and the one most frequently specified by contractors in primary bathrooms where the total bathroom footprint is limited.
Works well for: Primary bathrooms with limited square footage, single-occupant daily use, standard frameless panel or pivot door configurations.
The size at which walk-in showers become genuinely luxurious. At 48×60 inches (20 square feet), there is room for a bench seat without crowding the standing area, a proper niche configuration, a rainfall overhead combined with a handheld, and - if the design calls for it - dual showerheads for a two-person shower.
This is the standard specification for master ensuites in mid-range to premium Canadian renovations above the $40,000 budget threshold, and the size that produces the hotel-spa experience most homeowners are visualising when they say they want a "luxury walk-in shower."
Best for: Master ensuites, two-person households, premium renovations, and any shower that includes a bench, rainfall system, or body spray installation.

The frameless glass, curbless walk-in shower is the design that most Canadians are imagining when they say they want a walk-in shower. No curb at the floor entry, no metal frame around the glass panel, no shower curtain - just a continuous tile floor transitioning into the shower zone, bounded by a single panel or minimal enclosure of clear tempered glass. The result is the cleanest, most visually open bathroom layout available, and the one that most effectively makes a bathroom look and feel larger than its actual square footage.
The curbless floor is the defining element - it requires a linear drain or a carefully sloped tile floor with a centre or corner drain, and it demands a precisely executed waterproofing system beneath the tile. The frameless glass requires ½-inch tempered safety glass minimum (in Canada, all glass shower enclosures must meet the requirements of ANSI Z97.1 or CAN/CGSB-12.1, which governs safety glazing), and the hardware - hinges, handle, and any support clips - must be corrosion-resistant and rated for the wet environment.
- Glass safety glazing certification confirmed - CAN/CGSB-12.1 or ANSI Z97.1 compliant
- Waterproofing membrane confirmed in installer scope - Schluter Kerdi, Laticrete Hydro Ban, or equivalent
- Floor slope confirmed: minimum ¼" per foot toward drain in all directions
- Linear drain or centre drain positioned before tile installation begins - cannot be repositioned after tile
- Hardware finish matched to dominant bathroom metal finish throughout

A built-in shower bench - tiled to match the shower surround, typically cantilevered from the wall or framed as a corner seat - is the feature that most consistently separates a standard walk-in shower from one that feels genuinely premium. The bench is used for shaving, for sitting during longer showers, for resting handheld shower accessories, and for aging-in-place utility. It also serves as a design element: a bench that runs the full width of one shower wall, at the correct height (17-19 inches from the finished floor, matching standard seat height), reads as architectural rather than as an afterthought.
The minimum shower depth for a bench that doesn't obstruct the standing shower area is 48 inches - the bench occupies approximately 16-18 inches of depth, leaving 30-32 inches of standing room in front of it, which is the practical minimum for comfortable use. In a 36-inch-deep shower, a bench reduces the standing area to an uncomfortable 18-20 inches. The bench must be waterproofed on all surfaces (the top, front face, and sides), sloped slightly toward the shower drain, and tiled with a slip-resistant mosaic or textured tile on the seat surface.
A shower bench is also the primary element in an aging-in-place or accessible shower design. For a primary bathroom renovation in a home intended for long-term occupancy, specifying a built-in bench from the outset - even if current occupants don't need it - is significantly less expensive than adding one later. A grab bar installed on the bench wall at the same time as the bench framing costs $150-$300 CAD added to the renovation; retrofitting a structurally sound grab bar into an existing tiled shower wall after the fact costs $400-$1,200 CAD and requires opening the wall. Plan for aging-in-place features during the renovation window when the cost is incremental, not standalone.
- Shower depth confirmed at 48" minimum before bench is added to design
- Bench framing confirmed as part of rough framing scope - not added after tile substrate is installed
- Bench height confirmed at 17-19" from finished floor
- Bench top waterproofing membrane confirmed - all surfaces sealed before tile
- Bench top tile confirmed as slip-resistant - not polished stone or glazed tile
- Bench top slope toward drain confirmed - prevents standing water on seat
- If aging-in-place intent: grab bar blocking (2×6 minimum) installed in bench wall during framing

A ceiling-mounted or arm-mounted rainfall showerhead is the fixture upgrade that most dramatically changes the experience of a walk-in shower. The large-format head (typically 8-16 inches in diameter) delivers a broad, gentle flow that covers the entire body - a qualitatively different sensation from a standard wall-mounted showerhead. Combined with a handheld on a slide bar and, in premium configurations, body spray jets in the walls, a rainfall shower system transforms a functional shower into a daily experience that most Canadian homeowners cite as one of the highest-satisfaction renovation investments per dollar spent.
The planning requirements are specific and must be confirmed before the shower is designed. A ceiling-mounted rainfall head requires supply plumbing roughed into the ceiling (or a ceiling-height arm from the shower wall), which means the plumbing rough-in must be planned before the shower is framed - it cannot easily be added after the ceiling and walls are closed. A large-format rainfall head (12 inches or larger) also requires adequate water pressure and flow rate: most Canadian homes have sufficient pressure (standard Canadian residential water pressure is 40-80 PSI), but a system combining a rainfall head, handheld, and body sprays running simultaneously requires a thermostatic or pressure-balanced valve rated for the combined flow rate.
- Ceiling rough-in plumbing confirmed in plumber's scope before framing closes - cannot be added after
- Thermostatic valve specified for any system with two or more outlets
- Water pressure confirmed at 40-80 PSI from municipal supply
- Hot water heater output capacity confirmed against combined fixture flow rate
- Hardware finish confirmed to match dominant bathroom finish throughout
- Shower footprint confirmed at 48×60" minimum for ceiling-mount 12"+ rainfall head - smaller footprints make a large ceiling head feel overwhelming

An exposed shower system - where the supply pipes and valve body are mounted on the face of the shower wall rather than concealed behind tile - is one of the most distinctive and immediately recognisable design signatures of modern farmhouse and industrial-influenced bathroom design. The exposed black or bronze pipe fittings against white subway tile is an image that has become as visually associated with the modern farmhouse bathroom as shiplap or a white shaker vanity. Beyond aesthetics, exposed systems are also easier to install than fully concealed systems, because the plumber doesn't need to tile around concealed valve bodies with the same precision.
The exposed system includes a wall-mounted valve with exposed supply risers and a traditional gooseneck arm to the showerhead - all in the same finish as the rest of the bathroom hardware (almost always matte black or oil-rubbed bronze for this style). The result is a shower that looks handsome, functions reliably, and is entirely accessible for maintenance or future modifications without opening walls. It does require planning the pipe routing before tile goes up, because the exposed supply risers need to exit the wall at specific positions relative to the valve and showerhead arm.
- Supply pipe exit positions confirmed with plumber before tile substrate installed
- Valve body position confirmed: 48" from finished floor to valve centre
- All exposed fittings confirmed in matching finish - valve, risers, arm, head, and any handheld bracket
- Tile selection confirmed as compatible with style: subway tile or similar - not large-format contemporary tile (the style clash undermines both elements)
- Escutcheon plates confirmed for all wall pipe penetrations - covers rough pipe entry points cleanly

A steam shower - a fully enclosed walk-in shower with a steam generator that produces steam at temperatures of 43-46°C (110-115°F) within the enclosure - is the premium fixture upgrade that most consistently delivers a spa-quality daily experience. In Canada, where the climate creates a strong appetite for warmth and relaxation, steam showers see particularly high daily use through the seven-month heating season. Homeowners who install steam showers in primary bathroom renovations consistently report high satisfaction - the feature is used far more frequently than a soaking tub at comparable or lower cost.
The planning requirements are more involved than a standard walk-in shower. A steam shower requires a fully sealed glass enclosure (no open walk-in entry - steam must be contained), a steam generator (a boiler unit typically installed in a nearby vanity cabinet or closet), a dedicated 240V electrical circuit for the generator, and a ceiling that slopes slightly toward the shower interior to prevent condensation dripping from the ceiling onto the occupant. The steam generator supplies a dedicated steam head inside the shower (typically positioned low on the wall opposite the entry), and the entire shower interior - ceiling included - must be tiled and waterproofed to contain the steam.
- Steam generator sized correctly for shower cubic footage - manufacturer sizing chart consulted before purchase
- Dedicated 240V circuit confirmed in electrical scope - not shared with other bathroom circuits
- Generator installation location confirmed: must be within 25 feet of steam head, typically in adjacent vanity cabinet
- Ceiling slope confirmed: minimum ½" per foot toward interior - built into framing before tile substrate
- Full enclosure confirmed: no open-entry curbless design - steam must be contained
- Ceiling tile and waterproofing confirmed - steam showers must tile and waterproof the ceiling, not just the walls and floor

A wet room is a bathroom where the entire floor is waterproofed and sloped to drain, and the shower zone exists without a defined enclosure - the shower runs open to the rest of the bathroom floor. Unlike a curbless shower with a glass panel that defines the spray zone, a wet room has no fixed shower boundary: the showerhead is positioned at one end of the room, and the remainder of the floor is simply part of the wet zone. This approach is common in European bathroom design and has been gaining adoption in premium Canadian renovations over the past several years.
The architectural integration of a wet room is its defining quality - the bathroom reads as a single, continuous space with no visual interruption from a shower enclosure. The tradeoff is that the entire bathroom floor and lower walls must be waterproofed, which adds significant cost to the waterproofing scope (the entire floor, not just the shower zone, requires a membrane system and properly sloped substrate). The toilet and vanity must be positioned outside the primary spray zone, and any non-waterproof elements (wooden vanity cabinet bases, standard drywall above the wainscot height) must either be replaced with wet-area appropriate materials or positioned outside the wet zone entirely.
- Full bathroom waterproofing scope confirmed - entire floor and lower walls, not just shower zone
- Floor slope engineered across entire bathroom footprint - not just shower area
- Wall-hung vanity confirmed - floor-standing vanity bases not compatible with wet room floor environment
- Toilet position confirmed outside primary spray zone - 1,000mm minimum from showerhead position
- Lower wall materials confirmed as wet-area appropriate - standard drywall replaced with cement board or equivalent below spray zone height

A corner shower - positioned in a corner of the bathroom with two existing walls forming the back and side of the shower, and one or two glass panels forming the entry side - is the most space-efficient walk-in shower configuration for Canadian bathrooms with limited square footage. It uses existing wall structure on two sides (eliminating the need to build two new shower walls), and requires less glass than a shower positioned in the middle of a wall. In a bathroom conversion where a tub-shower combo is being replaced with a walk-in shower, a corner configuration often allows the shower to be positioned in the existing plumbing location without extensive rough-in modification.
The design quality achievable in a corner shower is equivalent to any other walk-in shower configuration - frameless glass, premium tile, rainfall head, and a built-in niche are all compatible with a corner layout. The primary constraint is size: a corner shower in a small bathroom tends to end up at the 36×36-inch or 36×48-inch footprint, which is functional but limits some of the feature options (bench, dual heads) that require a larger footprint. The corner layout is the correct choice when space efficiency is the priority - it is not a design compromise, it's a space-planning decision.
- Existing corner walls confirmed as non-load-bearing or structural modification planned - do not remove or modify a load-bearing wall without engineer approval
- Plumbing rough-in position confirmed for corner location - supply and drain both accessible
- Door swing confirmed: outward-opening door requires clearance outside shower - confirm no conflict with vanity or toilet
- Niche framed in one existing wall during rough framing - before waterproofing and tile substrate
- Waterproofing membrane confirmed on both existing walls and new partition walls - entire shower interior

A double shower - a single enclosure with two independent showerheads on opposite walls, each with its own thermostatic control - is the primary bathroom feature that most Canadian homeowners in the $60,000+ renovation category associate with genuine luxury. It requires a shower footprint of at least 60 inches in one dimension (typically the width) to allow two people to use the shower simultaneously without crowding, and a plumbing rough-in that extends supply lines to both shower walls.
The thermostatic valve configuration is critical: each showerhead position should have independent temperature and volume control, which requires a dual-outlet thermostatic valve or two independent valves. A single shared valve with two outputs (a common cost-saving shortcut) means adjusting the temperature on one side affects the other - which defeats the purpose of a two-person shower. Each side should also have a handheld on a slide bar, positioned at a height that allows both users to set their preferred head position independently.
- Footprint confirmed at 60"×48" minimum - smaller footprint compromises the two-person experience
- Supply rough-in confirmed to both opposing shower walls - in plumbing scope before framing
- Independent thermostatic valves confirmed for each showerhead position - not a single shared valve
- Hot water heater capacity confirmed against combined flow rate of both positions running simultaneously
- Handheld on slide bar confirmed for each position - independent height adjustment for each user
The glass enclosure is the most visible element of a walk-in shower and the one that most directly shapes the visual character of the bathroom. These are the main configurations, with the honest trade-offs of each.
| Configuration | Best for | Glass required | Cost range (CAD) | Key consideration |
|---|---|---|---|---|
| Fixed panel only (no door) | Open walk-in layouts with 48"+ opening width - no door needed if the opening is wide enough to prevent spray escape | One fixed panel or none if wall-bounded | $800-$2,200 supply + install | Opening width must be 36"+ for effective spray containment without a door |
| Fixed panel + hinged door | Most standard walk-in shower configurations - provides enclosure while maintaining visual openness | One fixed return + hinged door in matching frame | $1,800-$4,500 supply + install | Door opens outward - confirm clearance outside shower; ½" glass minimum for door |
| Frameless pivot door | Contemporary minimal aesthetic - the glass appears to float without a hinge column at the edge | Heavy pivot door only - hinges at top and bottom of glass panel | $2,200-$5,500 supply + install | Pivot mechanism requires precise installation - confirm installer is experienced with pivot door hardware |
| Sliding door (bypass) | Tight bathrooms where outward door swing is impossible - door slides along a track | Two sliding panels on overhead track | $1,200-$3,200 supply + install | Track requires regular cleaning - soap and mineral deposits accumulate in track groove; less visually clean than frameless |
| Full frameless enclosure | Premium showers where maximum visual openness and no metal framing is the design priority | Multiple panels, all ½" tempered, minimal hardware only | $3,500-$8,000+ supply + install | Most expensive glass option - custom sizing adds cost; requires experienced glass installer |
| Frosted or patterned glass | Shared bathrooms where privacy within the shower is a priority | Any configuration with frosted, reeded, or patterned glass substituted for clear | $200-$600 premium over clear glass equivalent | Frosted glass conceals the tile design inside the shower - consider the trade-off between privacy and visual connection to tile work |
- Available footprint measured and confirmed after subtracting toilet, vanity, and door clearances
- Shower footprint confirmed at 36×48" minimum for comfortable daily use - 48×60" if bench or rainfall is in the design
- Entry configuration decided: curbless (requires linear or centre drain and precise slope), low curb, or standard curb
- Drain type confirmed: point drain or linear drain - position set before tile substrate installation
- Floor slope confirmed: ¼" per foot minimum toward drain in all directions from the furthest point
- Showerhead supply position confirmed at correct wall and height before framing closes
- If rainfall ceiling-mount: supply rough-in confirmed in ceiling or upper wall before framing and drywall
- If steam shower: dedicated 240V electrical circuit confirmed in electrical scope
- If double shower: supply lines confirmed to both shower walls in plumbing scope
- Thermostatic valve specified for any multi-outlet system or steam shower
- In-shower lighting: IP65-rated fixture confirmed and electrical box positioned in ceiling before tile
- Waterproofing membrane confirmed in tile setter scope - Schluter Kerdi, Laticrete Hydro Ban, or equivalent on all shower surfaces including niche interiors
- If steam shower: ceiling waterproofing and slope confirmed - steam showers must tile and waterproof the ceiling
- Bench framing confirmed in rough framing scope if bench is in the design
- Niche position confirmed on non-exterior wall - exterior walls contain insulation that limits niche depth
- Grab bar blocking (2×6) confirmed in shower walls if aging-in-place intent
- Building permit confirmed for walk-in shower conversion - required in most Canadian municipalities
- Glass configuration decided: fixed panel, hinged door, pivot, or sliding
- Glass safety glazing certification confirmed - CAN/CGSB-12.1 or ANSI Z97.1 compliant
- Glass hardware finish confirmed to match dominant bathroom metal finish
- Shower floor tile confirmed as R10 slip-resistant - specification sheet reviewed, not assumed
- Shower floor tile: mosaic or small-format preferred for curbless floors - more grout lines = better grip
- Epoxy grout specified for shower surfaces - cement grout acceptable only with sealing commitment
- Tile overage ordered: 15% minimum for shower applications (more cuts, more waste)
Shop shower fixtures, vanities, and hardware at Bathify
Rainfall heads, thermostatic valves, frameless glass hardware, LED mirrors, and complete fixture sets - all shipped across Canada. Free shipping on orders over $50.


