






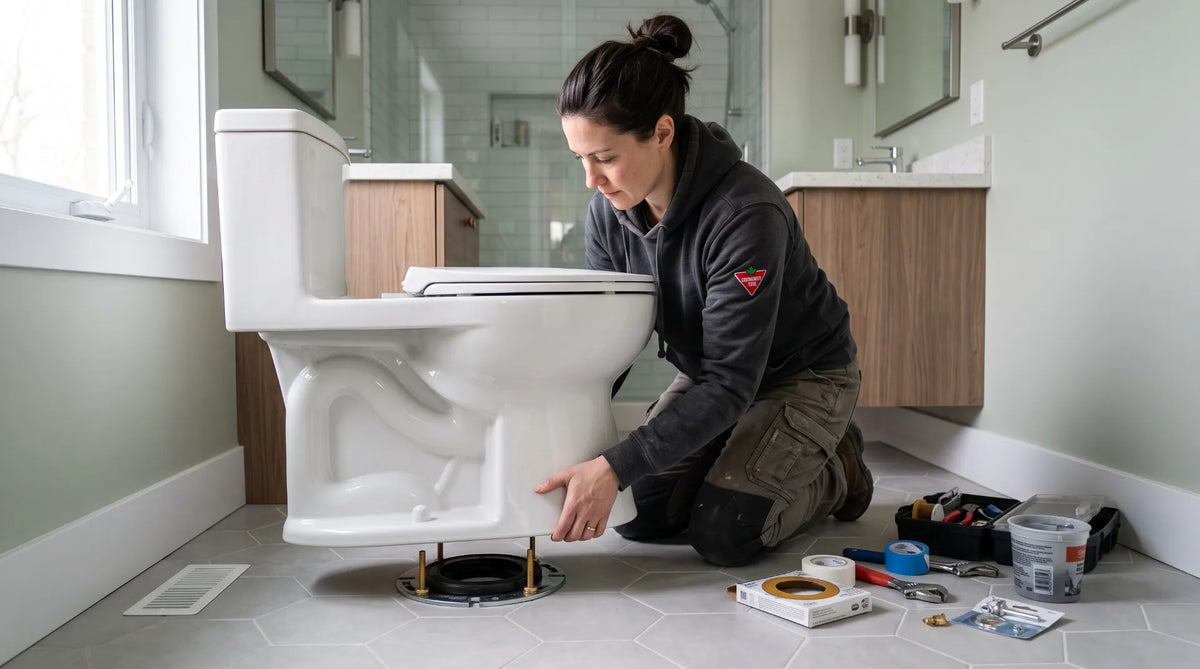
Replacing a toilet is one of the most approachable plumbing jobs in a Canadian bathroom - no permit in most cases, no licensed plumber required for a straightforward swap, and it's the installation question Bathify's team gets asked more than almost any other. Here's the exact process our team walks customers through: measuring your rough-in, the tools and parts you'll need, the wax ring and bolt steps most first-timers get wrong, and how to leak-test it before you call the job done.
At Bathify, our honest answer is yes - for the vast majority of Canadian households, replacing a toilet in the same spot with the same rough-in is a genuinely approachable DIY job, not a call-a-plumber job. It's the single installation question our team hears most often, more than wall-mount toilets, more than bidet seats, more than anything else in our toilet and bidet catalogue. The process is seven steps: measure, shut off the water, remove the old toilet, clear the flange, set the new wax ring, secure and test the new bowl, then finish with the tank, seat, and base.
The two things that actually determine whether this is a weekend project or a plumber's job are the condition of your floor flange and whether you're changing anything about the plumbing itself. If you're doing a straight swap - new bowl, same location, same drain - keep reading. If your flange is cracked, your subfloor feels soft, or you're moving the toilet to a new spot entirely, jump ahead to our DIY vs licensed plumber section before you buy anything. And if you haven't chosen a replacement toilet yet, our complete toilet & bidet buying guide is the hub this article supports.
Read the tools-and-parts section first and gather everything before you shut off the water - the worst time to realize you're missing a wax ring is with the old toilet already off the flange. Then follow the seven steps in order. If you're also deciding which toilet to buy before you start, our 1-piece vs 2-piece guide and our comfort height vs standard guide are worth reading before you order.
At Bathify, we'd rather tell you plainly what we do and don't carry than have you discover a gap mid-installation. We sell the toilet itself - bowl, tank, and seat, across 1-piece, 2-piece, and wall-mount formats - plus bidet seats and attachments if you want to add one while the water's already off. We do not currently stock wax rings, closet bolts, or braided supply lines, so plan a quick stop at a local hardware or plumbing supply store for those alongside your new toilet order from us.
| Item | Where to get it | Notes |
|---|---|---|
| New toilet (bowl, tank, seat) | Bathify | Confirm rough-in, height, and bowl shape before ordering |
| Wax ring (standard or extra-thick) | Hardware / plumbing supply store | Extra-thick if your flange sits slightly below the finished floor |
| Closet (flange) bolts & nuts | Hardware store | Often bundled with a wax ring kit - buy fresh even if the old ones look fine |
| Braided toilet supply line | Hardware store | Replace it now regardless of the old line's condition |
| Adjustable wrench or basin wrench | Tool | For the supply line and closet bolt nuts |
| Putty knife, old towels & a bucket | Tool | For scraping wax and catching residual water |
| Bathroom-grade silicone caulk | Hardware store | For finishing the base once the toilet is tested and secure |
| Sponge or wet/dry shop vac | Tool | To fully empty the tank and bowl before disconnecting anything |
| Bidet attachment or electronic seat (optional) | Bathify | The easiest time to add one is while the water's already shut off |
One more thing worth confirming before you start: if you're adding an electronic bidet seat rather than a standard seat, check that there's a GFCI-protected outlet within reach of the toilet, since every electronic bidet seat we carry needs one. A non-electric bidet attachment from our Parts and Accessories collection sidesteps that requirement entirely if an outlet isn't nearby.
At Bathify, a mismatched rough-in is, by a wide margin, the most common reason a new toilet doesn't fit - and it's entirely avoidable with one measurement taken before you order anything. Measure from the finished wall behind the existing toilet (not the baseboard) straight out to the centre of the two bolt caps at the base. That number is your rough-in.
Most Canadian homes built from the 1970s onward use a standard 12-inch rough-in, which is what the majority of Bathify's toilet collection is stocked in. Older housing stock - particularly pre-1960s builds in parts of Ontario, Quebec, and Atlantic Canada - sometimes uses a 10-inch or 14-inch rough-in instead, which narrows your options and may mean special-ordering. Once you've confirmed the rough-in, decide on format (1-piece vs 2-piece), height (standard vs comfort), and bowl shape (elongated vs round) - our team generally steers most adult primary bathrooms toward comfort height and an elongated bowl, and a 2-piece toilet if this is your first DIY swap, since the lighter bowl is easier to manoeuvre alone.
Turn the shutoff valve behind the toilet clockwise until it stops - this is almost always all the water this job needs to touch, since you're not working on the main supply. Flush the toilet with the lid off and hold the handle down to drain as much water from the tank as gravity allows, then use a sponge or a wet/dry shop vac to remove what's left in both the tank and the bowl. Getting the tank and bowl genuinely dry now saves a messy surprise when you tip the toilet on its side later.
Disconnect the supply line where it meets the fill valve underneath the tank - a shallow bucket or towel underneath catches any last bit of water. Pop off the decorative bolt caps at the base, then remove the nuts from the closet bolts holding the toilet to the floor flange. If they're corroded and won't budge by hand or wrench, a penetrating oil left to sit for a few minutes usually frees them; as a last resort, a hacksaw blade slipped between the nut and the base will cut through the bolt itself.
With the nuts off, gently rock the bowl side to side to break the wax seal's grip on the flange, then lift it straight up and set it aside on old towels - a 2-piece bowl is manageable solo, but a fused 1-piece toilet is considerably heavier, so have a second person ready if that's what you're removing. Immediately stuff a rag into the now-open drain pipe to block sewer gas from entering the room while you work.
Scrape the old wax off both the flange and the floor around it with a putty knife - it's messy but straightforward. While you're down there, this is the moment that actually decides whether the rest of this is a DIY job: inspect the flange itself for cracks, rust-through, or a height mismatch with the finished floor (the flange should sit level with, or very slightly above, the floor tile or vinyl). Check the subfloor immediately around it for soft spots, staining, or a spongy feel underfoot, which would indicate a leak from the old seal went unnoticed for a while.
A flange in good condition at the right height is a straightforward continue. A cracked flange, a flange set noticeably low, or any soft subfloor is where our team tells DIYers to stop and bring in a licensed plumber - repairing the subfloor or flange properly is a different job from swapping a toilet, and getting it wrong risks the exact leak-and-rot problem you're trying to avoid by replacing the toilet in the first place.
Insert new closet bolts into the slots on either side of the flange - fresh bolts are cheap insurance against the corrosion problem you likely just dealt with on the old ones. Place the new wax ring onto the horn (the outlet) on the underside of the new toilet bowl, wax-side down, rather than trying to seat it onto the flange itself - it's easier to keep centred that way.
With a helper if you're installing a heavier 1-piece bowl, lift the toilet and lower it straight down over the bolts, aligning the horn with the flange opening in one motion. This is the step where patience matters most: once the wax makes contact, avoid sliding or rocking the bowl to adjust its position, since that breaks the seal you're trying to form. If the alignment is off, lift the bowl straight back up, inspect the wax ring, and try again rather than shifting it in place.
Once the bowl is aligned over the bolts, press straight down with steady, even weight to compress the wax fully - some installers gently sit on the bowl for a few seconds to seat it evenly on all sides.
Thread the washers and nuts onto the closet bolts and tighten them by hand first, then finish with a wrench a small turn at a time, alternating side to side rather than fully tightening one before touching the other. Stop as soon as the bowl feels solid and doesn't rock - overtightening is a genuine risk here, since ceramic can crack under too much bolt pressure, and it's one of the more common mistakes our team hears about after the fact. Snap the new bolt caps into place once you're satisfied with the fit.
Connect the new braided supply line to the fill valve underneath the tank and to the shutoff valve on the wall, hand-tight plus a quarter turn with a wrench - not more. Turn the water supply back on slowly, let the tank fill, and flush several times. Then run a dry paper towel around the base and both supply line connections; any dampness that shows up on the towel within a few minutes means a connection needs another small turn, not a full re-do.
If you bought a 2-piece toilet, attach the tank to the bowl now using the tank-to-bowl bolts and gasket included with the toilet, tightened evenly the same way as the floor bolts. Install the seat, or - if you're taking advantage of the fact the water's already off - this is the easiest possible moment to add a bidet seat or attachment instead. Our bidet vs toilet paper guide and best bidet toilet seats in Canada guide both cover which format makes sense for a first-time bidet buyer.
Last step: the base. Run a bead of bathroom-grade silicone caulk around the base of the toilet where it meets the floor, but leave a small gap uncaulked at the back. That gap isn't an oversight - it's so a future base leak has somewhere visible to show itself rather than pooling silently underneath a fully sealed bowl, which is exactly the scenario that leads to hidden subfloor damage. Many current plumbing codes now specify this partial-caulk approach directly, so it's worth a quick check of your local code if you want the specifics for your municipality.
At Bathify, our team draws this line the same way every time a customer asks: a like-for-like swap in the same spot, on a sound flange and a solid subfloor, is a genuinely reasonable DIY project. Anything that touches the rough plumbing itself is a different job, and it's worth paying a licensed plumber to get right rather than risking a leak you won't see until it's expensive.
| Situation | DIY or plumber? |
|---|---|
| Same location, same rough-in, sound flange | DIY - the standard case this guide covers |
| Cracked, rusted-through, or misaligned flange | Plumber - flange repair is a different job than a toilet swap |
| Soft, spongy, or stained subfloor around the toilet | Plumber - subfloor repair should happen before a new toilet goes in |
| Moving the toilet to a new location | Plumber - relocating a drain typically also needs a permit |
| Installing a wall-mount toilet with an in-wall tank | Usually plumber - see our wall-mount toilet guide |
| Adding an electronic bidet seat to an existing toilet | DIY - a seat swap plus a T-valve, provided a GFCI outlet is nearby |
The single most common install question our support team fields isn't about wax rings or bolts - it's rough-in anxiety, customers double- and triple-checking their measurement before they'll click "add to cart." We'd rather field that question ten times over than have a toilet come back because it doesn't fit, so we genuinely encourage it. A rough-in mismatch remains the most common return reason across our entire toilet collection, which is exactly why we lead this guide with that measurement rather than burying it further down.
We also see a clear pattern in which toilets move fastest for exactly this kind of straightforward, same-spot replacement: value-focused two-piece options like the Caroma Sydney Smart II and water-efficient one-piece picks like the Agua Canada Totem are two of the toilets Bathify ships most often for a DIY swap, largely because both are stocked in the standard 12-inch rough-in that fits the vast majority of Canadian bathrooms without any surprises. And a meaningful share of customers doing a DIY toilet replacement add a bidet seat or attachment to the same order - once the water's already shut off and the old toilet is already out, the marginal effort to add one is close to zero, which is probably why we see the two purchases bundled together as often as we do.
Not unless it's leaking, seized, or won't fully shut off the water - a functioning valve doesn't need to be touched just because the toilet is being replaced. If it is stiff or drippy, though, this is a convenient time to have a plumber swap it while the water's already off, rather than dealing with it as a separate job later.
Almost never worth trying - seat bolt spacing varies enough between models and brands that a perfect fit is more luck than plan, and every new toilet Bathify sells includes a properly fitted seat anyway. If you're specifically upgrading just the seat later, our Bidets & Toilet Seats collection covers both standard and bidet replacements.
Penetrating oil left to soak for several minutes solves this more often than not. If the nut still won't turn, a hacksaw blade slipped between the nut and the porcelain base cuts through the bolt itself - go slowly and keep the blade angled away from the toilet to avoid scratching or cracking it.
A properly compressed wax ring doesn't need curing time the way caulk or adhesive does - once the bolts are tightened and the leak test is clean, the toilet is ready for normal use immediately. The caulk bead around the base is the one thing worth giving a few hours to firm up before it takes any real contact.
The Bottom Line: Measure Twice, Trust the Flange Check
For most Canadian homeowners, Bathify's recommendation is straightforward: a same-spot toilet replacement is a legitimate weekend DIY project, not a job that needs a plumber by default. Measure your rough-in before you order, work through the seven steps in order without rushing the wax ring step, and don't skip the flange inspection in step four - it's the one moment in this whole process that actually tells you whether to continue or call a professional.
If the flange and subfloor check out, budget an hour or two, gather your tools and hardware-store parts before you start, and expect a clean, leak-free result. If they don't check out, that's not a failed DIY attempt - it's the job correctly identifying itself as one for a licensed plumber, and it's better to know that in step four than after the new toilet is already installed.
Whichever way it goes, Bathify carries the toilet itself - 1-piece, 2-piece, and wall-mount, in the standard 12-inch rough-in most Canadian bathrooms use - with free ground shipping over $50 and a 30-day return policy if the fit isn't right.
Three real toilets currently sold at Bathify, all stocked in the standard 12-inch rough-in and suited to a straightforward DIY replacement, with free ground shipping on orders over $50 across Canada. Remember: the toilet is what we carry - pick up a wax ring, closet bolts, and a supply line at your local hardware store to go with it.

The two-piece toilet our team points budget-focused, first-time DIYers toward most often. Caroma pioneered the world's first two-button dual-flush toilet, and the Sydney Smart II carries that engineering into a straightforward suite that's a genuinely easy swap for most existing Canadian bathrooms - the lighter 2-piece bowl is also simpler to manoeuvre solo than a fused 1-piece unit.

A one-piece, rimless, dual-flush toilet that's WaterSense certified and rated as a High-Efficiency Toilet (HET) - the category most Canadian municipal and utility rebates target. The skirted trapway wipes clean in one pass, the soft-close seat is included, and the standard 12" rough-in fits most existing Canadian bathrooms without moving the flange. This is the one-piece toilet Bathify recommends most often when a customer's main priority is a low-water, low-maintenance replacement.

The pick our team suggests if you'd rather replace the toilet and add a full-featured bidet seat in one order instead of two separate purchases. This two-piece toilet is built to conceal the WASHLET's power cord and water line for a seamless look, paired with TOTO's S7A seat - heated seat, instantaneous water heating, five spray settings, auto open/close lid, and EWATER+ self-cleaning wand - plus a touchless auto-flush. Since you're already handling the wax ring and bolts either way, this is the option that gets the bidet upgrade done in the same afternoon.
Not sure which toilet fits your rough-in or bathroom? The Bathify support team can help you match a toilet to your measurements before you order, and every purchase ships across Canada with a straightforward return policy if it turns out not to be the right fit.
Ready to Replace Your Toilet? Shop Bathify Canada
1-piece, 2-piece, wall-mount toilets and bidet seats from Caroma, Agua Canada, TOTO, and Brondell. Free ground shipping on orders over $50. Delivered across Canada, with a 30-day return policy.


